
Change IP Address in Internet Explorer
A "how to" provided by iPrivacyTools.Blogspot.com
Internet Explorer is the #1 application for which people want to change their IP address. Why? Because it's the #1 browser with which people surf the Internet. Reasons for wanting to change IP address in Internet Explorer include increasing privacy, as well as a variety of business, travel, gaming and marketing purposes.
The method described on this page for changing your IP in IE involves using Internet relays. If your intention is only to surf pages on the web, you're probably fine using free public proxy servers. However, if you're going to be logging into secure pages with passwords (e.g. email) or entering any kind of personal information on the Internet, then you should really use private relays that offer reliable SSL connections. One example is our service, iPrivacyTools.
STEP #1 to change IP address in Internet Explorer
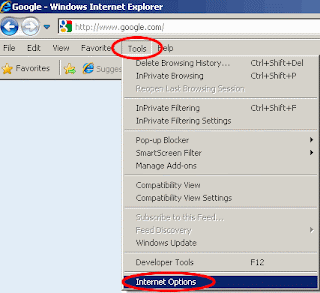
Go to your Internet Explorer's dropdown menu for Tools -> Internet Options
STEP #2 to change your IP address in Internet Explorer
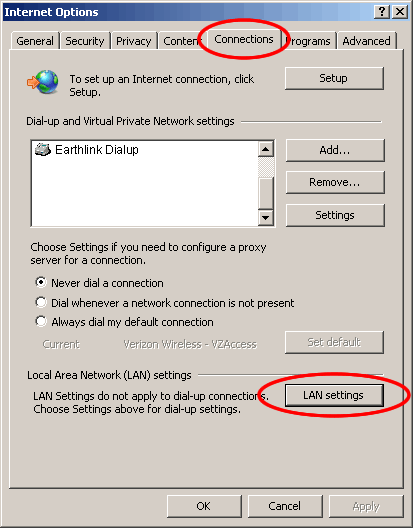
- Click on the Connections tab.
- If you have a dialup connection, select the dialup connection, and then click Settings.
- If you have a cable/DSL or other broadband connection, click LAN settings.
STEP #3 - Configuring the proxy server
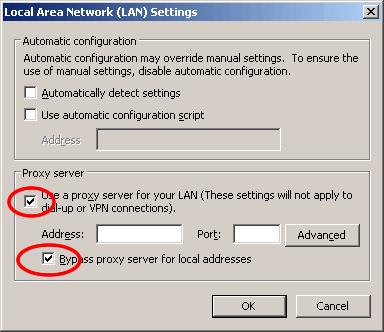
Check the box for "Use a proxy server for your LAN" and the box "Bypass proxy server for local addresses"
STEP #4 to change IP address of Internet Explorer
Enter the IP Address and port number for the server you would like your traffic to relay through (more info below)
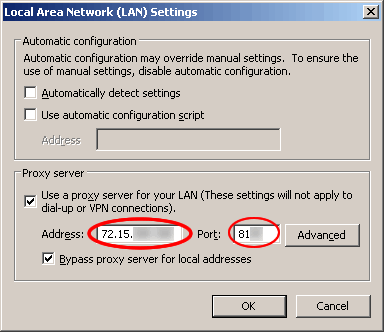
The "address" you enter should be the IP of a valid proxy server. As mentioned at the top of this page, you may either use free public proxies that you find on the Internet, or private proxies from a service such as iPrivacyTools. With either type of provider, you'll find that the "ports" are supplied along with the IP addresses.
If you choose to use free public proxies, be sure to use them only for browsing web pages, and not for submitting any forms that require passwords, personal information, or financial data. Here's why.
STEP #5
-Click OK to confirm the changes and close the dialog box.
-Surf to iPrivacyTools.com/my-ip-address/ to confirm that your IP address has changed.
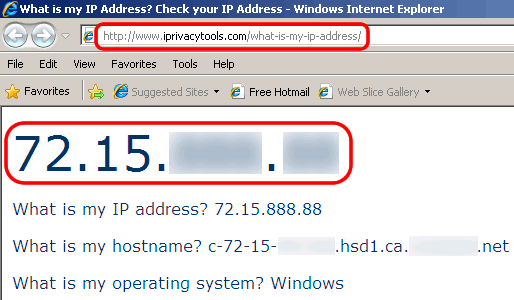
Congratulations - you haved completed the change of IP address in Internet Explorer!
*Whenever you want to surf with your regular Internet connection, just follow steps 1-3 again, but UNcheck the box for "Use proxy server for your LAN".
No comments:
Post a Comment